Tutorial on React Native
React native lets you build cross platform mobile application with little to no knowledge needed on the native language.
The only case when you need to learn native language is when you need to make some edits internally to tweak the performance, but having the knowledge of ios or android will help you understand the functionality better, to build the application production ready etc..
You can use your knowledge of react directly to build react native. All the concepts of components, state management, hooks, context api etc.. remains the same, and thats the beauty of it.
Only thing that is different about developing with react native is to learn the styling, which again is very similar to css
Let's begin
Environment Setup
For Windows
Install openjdk8
Download and install Android Studio, we will need the following Android SDK, Android SDK Platform, Android Virtual Device (to run the simulator)
Add the Android SDK path (username/AppData/local/Android/Sdk) to Environment variable PATH
For MacOS
Install XCode and ios simulator along with it
In this tutorial we'll create an tutorial app which shows a list of tutorials a user has subscribed to. While building this app, we'll learn some very interesting built-in components that are given by react-native
npx react-native init learnings_appcopy
The above command same as CRA, creates a template for us to get started on building the app. Open the folder in your choice of editor
That is all the setup that you need to do
How exactly does react native work?
When you write some javacript code that is converted into an equivalent native ui element. For example: RN has something called a Text component which is mapped to a TextView which is an android native component
When you start the react native app, a metro server is started. A metro server is what serves your code to the mobile device.
Your application is not completely installed on the mobile device when you are using the development environment. In order to independently run it on a mobile device you need to build the application and install it on your device
When you build the application, all the assets, like images, raw files are all bundled into a single application package.
Let's start building the app
Open terminal and run the respective command
You can either run the application on your phone or run it on a emulator.
In case of an emulator open android studio or xcode and create an emulator with all default options
Open the emulator and wait for the mobile device to boot up
In case of a physical device you need to enable USB debugging on your device
Once that is done, connect the device to your PC and if you get a popup to "trust this computer", click on "yes"
Your app should build and install on the device and open a home screen saying "welcome to react native"
npm run androidcopy
If for an reason the build fails, check the following steps
- Open the android/io folder of your project in android-studio/Xcode respectively and build the application once the project is loaded successfully
- In case of android, open settings and check if the SDK path is set to the right location
If you have your application up and running then you are good to go
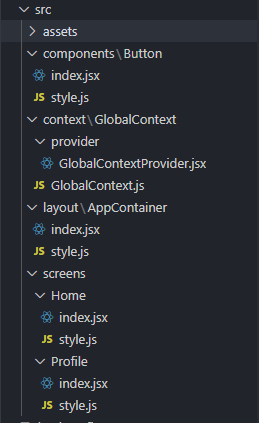
Project Structure
Create this folder structure in your project, do not worry about the contents of these files, we'll add that later
Lets put in some starter code in each of these files.
Go to all the index.jsx files you just created and paste the following code
import React from 'react';
import { View } from '...copyGo to all the style.js files you just created and paste the following code
import { StyleSheet } from 'react-native';

const...copyNow we have some basic idea of what screen will be present in our app, now we need a way to navigate between the screen, for that purpose, we'll use a library called react navigation
Open the terminal and run the command below
npm install @react-navigation/native @react-naviga...copy
Lets learn a new react concept:
React Context API
A context api is high level state management. If there is data that is common to multiple components or screens, then we use context API to store it in one place and use that data everywhere else. How is it different from maintaining state at the app level? If you maintain a local state in App.js then you have to pass it down to every component that needs it. But with context API the props need not be passed. All the components which are children to the context will have access to the state via useContext hook.
Lets create a Global context which stores some of the basic app and user info
Go into the /src/context/GlobalContext/GlobalContext.js Lets create a React context here. A context is basically an object which will hold the value given by its respective provider
import React from 'react';

const GlobalContext =...copy
Now lets create a provider to this context which will basically tell the context what data needs to be served. Go into ./GlobalContext/provider/GlobalContextProvider.jsx
import React, { useState } from 'react';
import G...copyHere, we are creating two state variables which we think will be used across the app repeatedly. Hence we will store that in the GlobalContext, the provider returns the children which are enclosed in that tag
Now like you can see in the App.js we have wrapped the entire app with GlobalProvider so that all the components have access to the context data. This is an important step
You can also see something called SafeAreaView which is used to handle the top bars. Some of the common things which block the screen view are:
- Physical notches
- Status bar overlay
- Home activity indicator on iOS
- Navigation bar on Android
In order to avoid your app view from overlapping on these screen elements, we use a SafeAreaView
npm install react-native-screens react-native-safe...copy
Lets build the Home screen now, the Home screen is supposed to contain a list of tutorials a user has subscribed to
Preview
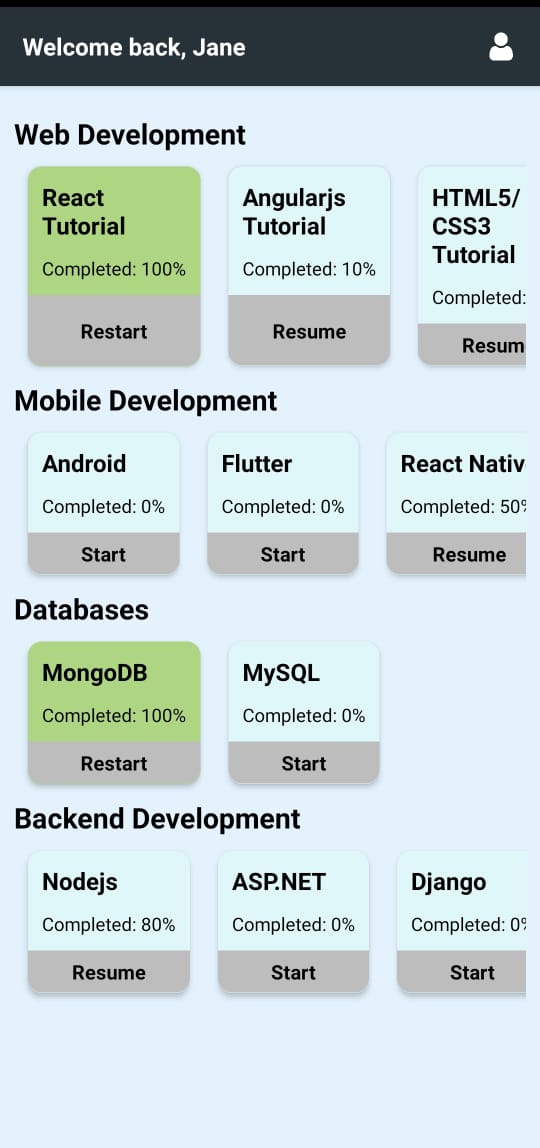
So, lets think about the list of components we can build
- A card: To show the tutorial name
- A Header
We'll start with the card component
The card component will consist of a tutorial name, type of tutorial, completion status
We'll need some dummy data to get started with, copy the below object and paste it into a file called constants.js
Let's keep that aside for now, create a folder called card inside the components directory. ./src/components/card/index.jsx
In react native, there are mutliple types of UI elements, some of the major ones are:
- View: This is similar to a div, it renders a part of the screen, it can be as small as a Dot and as big as an entire screen.
- Text: Corresponds to a text element
- Image: To render images, takes a source property similar to an img tag in HTML
- Touchables: They are the ones which respond to touch events, all these elements emit a onPress() event
TouchableOpacity: Gives a visible response on touch by reducing opactity of the view
TouchableWithoutFeedback: Gives no visible feedback
TouchableHighlight: Highlights the view with a border
Our card component will be a touchable element, because in the actual app, if we click on a tutorial we want to start the tutorial
Look at the code below and try to understand what is hapenning
import React from 'react';
import { Text, Touchab...copyWe have two text elements to show the title and completion status and an arrow image to give a notion that it is a clickable element
Now lets style the component, you can see that we have already added some styling object, now lets create the style objects
Go into the style.js for that component, paste the same starter code for a styling file
container: {
	borderRadius: 10,
	margin: 10,
fle...copyYou can see that the styling is very similar to css, some things that are different are:
- You don't mention the units for a value, like px, pt, em, or rem. Because each native platform has its way to interpret the screen size. So we just give the value
- If you want a view to flex, instead of display: flex, we give flex: 1
- Margin, padding does not take all 4 sides, we need to give individual side values.
- All style attributes are camelCase
Once you are done styling, you can pass the object to a stylesheet create function, which checks the object for errors and returns an object, which is referenced in your component
Back to the Home screen, where we'll render the card component for each tutorial
Things we will need to build this screen:
- ScrollView: Using this view we can render as many items as we want and as the screen size grows a scroll bar is added
- FlatList: We can use this to render items in a horizontal way, where all the tutorials that belong to a single category go into this list
Difference between Flatlist and ScrollView is that Flatlist renders items lazily (on-demand), while scrollview renders all items and stores it in RAM
If you have a very long list, then Flatlist is the one to go. If you have limited number of items it is your personal choice
/home/index.jsx
import React from 'react';
import { FlatList, Scr...copy
import { StyleSheet } from 'react-native';
import...copyHead over to App.js and remove the content being rendered in the function, and paste the below code
/**
 * Sample React Native App
 * https://github....copy
The App component acts as a master telling which screen needs to be rendered and what data needs to be passed to all the children components
quite a few things are happenning here, let's go over each one of them
- We have two screens, Home and Profile screen
- We can have a customized header for each screen
- We want to add a profile button on the home screen, so that we can get to the profile screen, but we don't need that on the profile screen
- Header Title is a custom component, so that we can style is any way we want
- The options prop for the stack.screen has navigation attribute passed down, we can use this to navigate between screens, so when the user clicks on profile icon, we go to profile screen
- If you recall we discussed about touchables, so we wrap the profile icon with TouchableOpacity, so that we can do something in the onPress callback
- Lastly, you can see that we have wrapped all these components with the GlobalProvider, so that we have access to the user details and other global data.
- We have used the username in the HeaderTitle component, see below
./src/components/HeaderTitle/index.jsx
import React, { useContext } from 'react';
import...copyWe need to make a final change before we can run our application
Open the metro.config.jsfile
resolver: {
sourceExts: ['jsx', 'js', 'json', 't...copyAppend the following object after the transformer attribute, this just tells the bundler to include all these file extensions
Go ahead connect your emulator/device and run npm run android/ios based on your platform
Thats it, we are done with this tutorial
Next steps: Try and build the profile screen by utilizing the data from the context api
