Tutorial on React
What is React?
React is a javascript library to build UI.
Advantages of using React
- You can divide your web app into teeny tiny reusable components.
- Each component has its own state. So, if something fails you don't to scan through your entire app to find the defect.
- Since its just a library and not a framework, it does not need any prior syntactical knowledge.
You might have not heard of couple of terms used above, worry not, we will go over all these concepts in the next steps.
Ok, that enough theory, lets jump into the code.
A preview of what you will be able to achieve at the end of this tutorial


Environment Setup
Things needed to get started with react.
- Node runtime (https://nodejs.org/en/download/)
- VS Code (IDE for writing code).
Once you are done installing both these tools, head over to the command line and run the following commands.
npx create-react-app personal-websitecopy
Replace the name 'personal-website' with whatever name you want to give to your application.
While the commands takes time to complete, lets see what it says.
- npx - is a package runner tool which installs and runs the package. Here, it will install a tool call create-react-app (in short, CRA), and runs the CRA to create an app based on what ever name you've mentioned
- npm - we have not used npm so far, but npm is a package manager, it only installs a package and records all the packages installed in your app into a single file names 'package.json'.
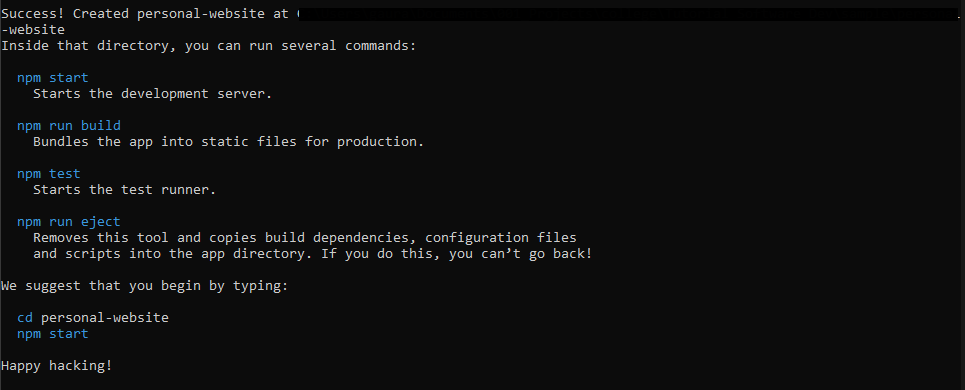
Your command should have exited by now, if not, then just wait for a few minutes.
Open the directory created with the name of your project, in this case 'personal-website'.
Launch VS Code and click on File - Open Folder (Select the react app folder that just got created).
Now there are a bunch of files here magically already created.
This is what CRA has done, it has provided a boiler plate code which will let you get started with developing your own application.
If you do not see a terminal open in VS code, then head over to the top menu, click on 'Terminal' and 'New Terminal'.
In the terminal typenpm startcopy
Wait for the command to run and it will open the browser window with your new react app. That's all the setup you need to get a react app up and running.
Project Structure
Let's explore the files and folders that are created.
- node_modules: This is a directory which has all the dependencies or libraries required for your application to run. When you expand the directory you might find numerous dependencies, most of these dependencies are added by CRA, as and when you add new libraries to your project they will appear in this directory.
- public: As the name sounds, the files in this directory are the only ones that are made public, and can be directly accessed from your website URL.
- package.json: A very important file, this files has information about your project.
- project name
- version
- A dependencies object: It contains entries of each library and the exact version
- scripts: all the commands that are required by your project
- 1. start: to start your project on the environment it is currently present.
- 2. build: to build a production ready application. When you host your project, you will not be hosting your src or public directory. You will create a production build which will have the most optimized version of your project in a "build" folder.
- 3. test: To run unit tests written in your project.
- 4. eject: This is beyond the scope of this tutorial. This command is used to get access to all the under-the-hood operations handled by CRA. If you want to modify something that is built into the library you need to eject the app. I recommend you to not run this command until you read about its consequences thoroughly.
- src: This is the main directory which will have all your applications code.
Building the Application
Lets look at the code already present in the src directory. Head over to App.js, this is where the code is which is being rendered on your browser currently. Remove all the code that is being returned from the function App(). Just put it a Header tag saying "hello" and hit save, you see that the browser automatically refreshes and you can see your chages there. This is called a live server.
Routing
As you all got a glipmse of the end result, there are two pages that we will be building today.
- Homepage or the landing page.
- Contact me page.
Lets define a route to tell the app what page to render on what route. Directly under the src directory, create a file called 'route_config.js'.
Paste this code into the file. This code basically is what tells the different pages that are rendered in your application.
export const routes = [
    {
name: 'Home...copyWe'll get into what is routing in-detail in a bit.
- Under the src directory, create a sub directory called 'pages'. This is where we will have all the pages used in our application
- Under pages directory, create two sub directories called 'home' and 'contact'
- Under each of the sub directories home and contact, create the following files. 'index.jsx' and 'style.css'
- All the html and javascript will go into the index.jsx and the styling will go into the style.css file.
- You might have a question as to why we are using jsx extension and not js.
- JS - is a standard age old javascript file.
- JSX - is a javascript file embedded with parts of HTML code
When you create a pure html page you need to add all the parent tags, like the <html> <head> <title> etc.. But a JSX file returns only a small part of UI, like a page container, a button, a link tag etc..
Ok, lets get back to the code.
Once all the directories and files are created your project structure should look like this
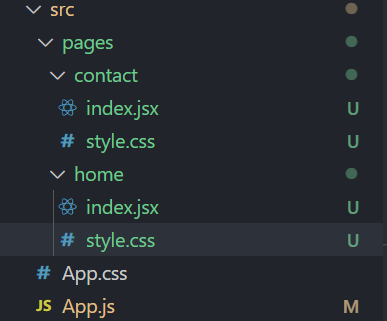
Go into the index.jsx file in the two directories and paste the following code snippet.
-------------------------
/src/pages/home/index.j...copy
Lets get back to these files later and explore why both of them have different code snippets but return the same html.
Now, lets go back the route_config.js file.
Here on top of the file paste the following import statements.
import Home from './pages/home';
import Contact f...copy
Basically, we just created the components that we had previously written in this file, now we are importing those components to make it valid. To verify if you imported the right one, just right click on the Home tag and click on 'go to definition', if it takes you to the right file then your import statements are right.
Now lets render these pages in our application. If you check the browser it should still say 'Hello!'. If it says something else you are far ahead in this tutorial.
Open the App.js file and import the constant that we created in the route_config.js file. Do not look at the code snippet, try to import it yourself.
import { routes } from './route_config';
copy
Now you see, there is a difference in the import statements.If a file does not have a default export then it needs a { object_name } in the import statement, otherwise you can directly import the object.
Ok, now that we have imported the routes configuration, we need a package that can help us render the pages when a specific url is hit in the browser window.
Open the terminal again, and type the following command.
npm i react-router-domcopy
Once the library is successfully installed, you can see that it is added to the package.json file. Let's import the router into our app.
Head over to App.js and paste the following code snippet.
import './App.css';
import { routes } from './rou...copyWhat we are doing here is basically creating a Router, which has a Switch, this is similar to having a switch case in our code, based on the url case value it decides what route to be called. The Route mentions the case value and it respective return value. The case value is the path (or the relative url path) and the return value is the component that was defined for that path in the routes config file.
If you carefully look, we have mentioned a keyword called exact in Route, this basically tells the router to render this route when the path is an exact match and not a regular expression match.
Now, go ahead and head over to you browser and see the changes. You can try the following urls in the browser and see the contents changing.
localhost:<port-number>/
localhost:<port-number>/...copy
Take some time here and see how each of the files are related to each other and what is the role of every piece of code you just wrote.
Components
The very foundation of React and the reason why react is very popular is because of the concept of Components.
So, what is a component?If you go with the english definition, it means
"A part or element of a larger whole"And that is what it exactly means in a react application. A component is a small UI part of the whole web app that is being built. A component can be as small as a button, to as big as an entire page. A Component can be constructed by grouping together multiple smaller components.
Look at the below image and see if you can list out a few components.
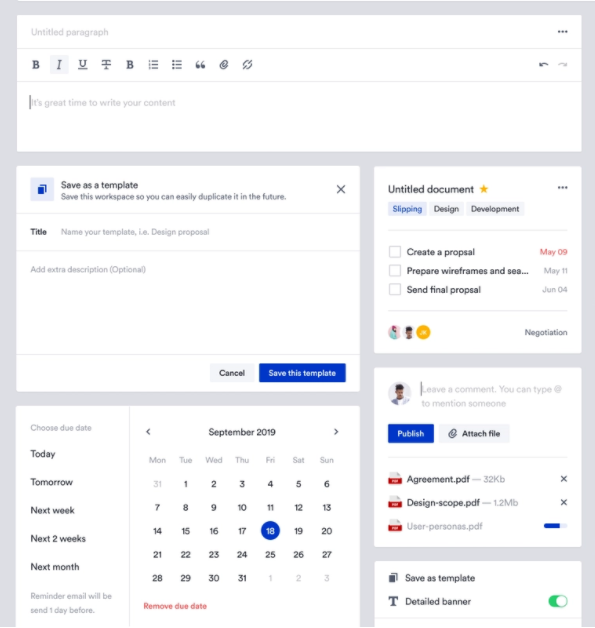
Components:
- Text Formatter
- Text Editor
- Options
- Date Selector
- Button
- Check box
- LinkText
If you got any of these then you were right, if you could list more, even better.
That is the basic definition of a component.
Types of components.
- Functional Components
- Class based Components
There are other kinds of components, but they are basically exentensions on these two basic kinds.
Functional components are components written as javascript functions, the return value of a functional components is the UI that will be rendered.
Class based components are components which extend the class React.Component A class based component has a render() function which tells what the component renders on the webpage.
Lifecycle of a component
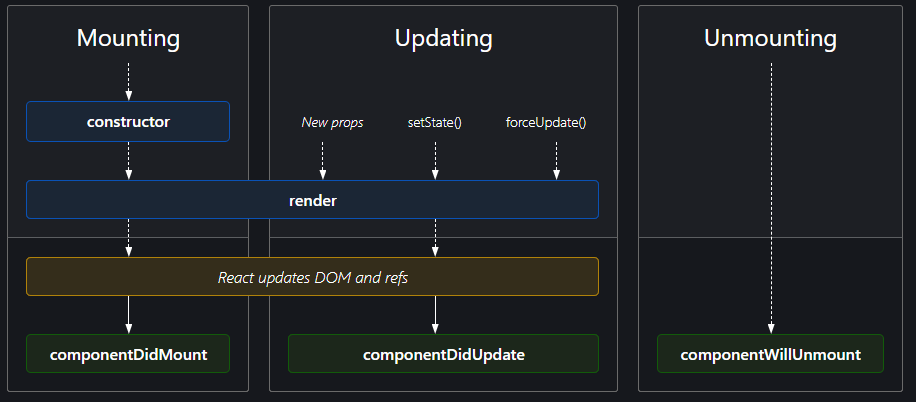
A constructor is called when a component is first inserted into the DOM, a costructor basically initializes the state of the components.
State: The state of the component can be picturized as the properties that control the behaviour of the component. When ever the state changes something in the component will/might change.
The render function is called to bring the UI onto the browser.
componentDidMount() is a function that is called when the component written is mounted to the DOM or in other words, when the UI is visible on the browser window.
componentDidUpdate() is a function that is called when the state changes (meaning some property of the component changed) which means the component has to re-render.
These functions are used in a class based component. The lifecycle of a functional component remains the same except for a fact that the naming convention changes.
In a functional component hooks maintain the lifecycle of that component intact.
There are some important hooks that are covered in this tutorial
- useState()
- useEffect()
There are many more hooks which are out of the scope of this tutorial, but you can go through them from the react docs.
useState hook help maintain (create, update) the state of the component.
syntax: useState hook takes a initial value for a state property and returns an array of two objects, a getter and a setter for that state property.
eg: const [name, setName] = useState('Dave');
here name is the getter which will intially hold the value 'Dave', setName is the setter which is used to change the value.
useEffect, as the name sounds, reflects on the sideeffects of the components. A componentDidMount is a sideEffect telling that the component just mounted, componentDidUpdate is a sideEffect of some state changing.
syntax: useEffect takes two arguments, first is callback that should be executed when soemthing changes, second argument is the dependencies list (the change). An empty dependency list indicates that we want to execute the callback only once, that is when the component mounts.
eg:
useEffect(() => {
// do something when component...copyOk, that is good enough to get you started on the building the application.
Lets start with building the home page. As you saw from the preview of the website, we will need couple of components for the home page.
Copy the following starter code to get yourself setup for home page.
Some root level css:root {
--bg-color: #263238;
--primary-color: #e...copyimport React from 'react'; import './style.css'; ...copy
.button {
	padding: 1em;
	border-radius: 0.5em;
d...copyimport React, { useState } from 'react';
import '....copy.title {
font-size: 4em;
margin-top: 20%;
}
.de...copyWe have created some components and put them under respective folders.
Button is a common component and we have added it under the common folder and Row, Col are more of layout design specific components and we have added them under layout components,
Why dont you try and add code to these two layout, they are very simple components (Hint: All you have to do for Row is, arrange the children under Row in the horizontal plain)
Similarly you can add any number of categories of your choice which makes it easier to navigate and cleaner code.
Once you have these files setup, just take a minute and look over all the files you just copied. Its just a bunch of html and css. Feel free to style it anyway you want and add a Hero image of your choice.
Now lets see how to use state management to hold a value.
Head over to /home/index.jsx
lets add a state variable which will hold a boolean value.
const [subscribed, setSubscribed] = useState(fals...copy
All we are doing here is, Initially, the subscribed value is false, indicating the user has not subscribed to the blog.
if the user has clicked on subscribe button, we change the state value to true, making the component re-render and the UI change. The button gets hidden and the text changes.
There are several things to observe here, if you see the button component there are several incoming variables like the type, clickHandler, etc..
These are called the props of a component. You can add such props to change the behavior of your component and make it as generic as possible.
This is somewhat similar to inversion of control (You build something basic and let the caller add any more modifications as needed).
Thats great. We learned many things soo far. Take a couple of minutes and recap what has been taught till now.
Let's head over to the contact page and look at few more concepts
lets create a component to take text Input.
src/components/common/input/index.jsximport React from 'react'; import './style.css'; ...copy
.inp-wrp {
	display: flex;
flex-direction: column...copyWe'll use this component to create a form in our contact page
Paste the following contact form that is created below.
import React from 'react';
import './style.css';
i...copy
.ct-c {
	max-width: 50em;
	margin: 0 auto;
backgr...copyLets see what are the new concepts we introduced in this page.
- The state implementation is different compared to functional components.
- binding functions to this.
- componentDidMount
- setTimeout
- ... spread operator
state implementation in class based components is linked to the 'this' object of the class. You need to initialize the value of the state in the constructor.
You can access the state using this.state.variable_name.
In order to set a value, you need to call this.setState function which will take a new state object
Binding functions to this: In order to get access to the state in a different function, you need to bind the function to this object which makes the function a part of the class.
componentDidMount: We use componentDidMount to make API calls or connect to a web socket or side some UI elements etc...
setTimeout: this is a asynchronous function which executes a callback when a specified time duration has passed.
In this scenario we are using it to show or simulate a API call, which gets data from a server.
spread operator is a very useful concept, it is used to modify child objects and create a copy of the modifying object. If you are not familiar with this concept please make sure to read through it.
Let's look at how these concepts are used in our Form.
- We initialize the state to consist of the form inputs, which are name, mail and message fields. Initially they are empty
- In the componentDidMount we simulate the behaviour of an API call and set some data which we intend to retrieve from our backend server. In this case, we are setting the jacob's email id and home address.
- HandleSubmit is a form submission function. In this case we are just logging the entered values to console. But ideally you would be making an POST call to your server to save this data somewhere.
- If you closely look at each of the <Input /> components you can see that onChange is an inline function, and we are doing certain tasks in that function. we are spreadind the existing state object and modifying only the respective field and passing that result to setState function.
- The input value that you get to see in your browser is coming from the value prop for Input component. Whenever you type something, the onCHange is called, which modifies the state value and which in turn rerenders the page causing the value to get updated in the UI.
This covers some major concepts of React. There are many more concepts that can be found in the react docs. Please start by building your own application, you will definitely come across many new interesting features.
We have so far seen how great react is. But there are some downsides of using CRA, major one is react is completely rendered with javascript.
Meaning:
- If you view the page source of your react app, the only thing that you can see is the index.html from the public directory.
- This is a problem because the search engines will be able to find your app based on the content your app serves to the engine to crawl through.
- Since react is completely rendered on the client-side (browser) when the URL is hit in the browser search engines will not wait for the javascript to get downloaded (Google is improving its ability, but most others cannot index content rendered with JS)
There are multiple solutions to this problem.
- Using libraries like React snap - which generate static HTML from your react app.
- Gatsby - which is great to build static apps with react.
That concludes this tutorial on React
 Next Tutorial: Mongo DB